Cdog911
"There are some ideas so absurd only an intellectual could believe them."--George Orwell.
Member # 7
|
 posted December 15, 2015 07:07 PM


Had so much fun building that skinning rig for my truck that I decided to try my hand at building cage traps like those fancy rigs you can buy for the low, low price of mortgaging your home. Since our cats aren't worth nearly what they are in places like AZ where paying $100 for a decent cage is cost effective, I decided to see how much I could build one for. Francom told me on FB that I couldn't do it because he tried and couldn't. Challenge accepted. I now have three of them, identical in every way to one another. Some of the design I borrowed, and other features are carry overs from the guy that mentored me in my early trapping days and the live trap door/trigger design that he used. These are cages built from stuff you might have lying around or can get easily at any hardware, home or farm store. I've spent the past three weeks working on these things after work, usually for an hour or two every night, except for a few, until the sun goes down. All I have is a 110V welder rated for light steel, a cut off saw and a hand grinder.
Here is the finished trap, minus the mesh wire wrap. I decided to take some pics now before wrapping so the innards are easier to see.
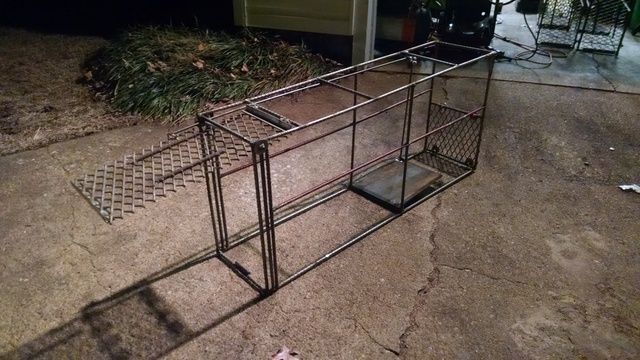 [/URL] [/URL]
and here is it with the door down and secured by the drop bolt...
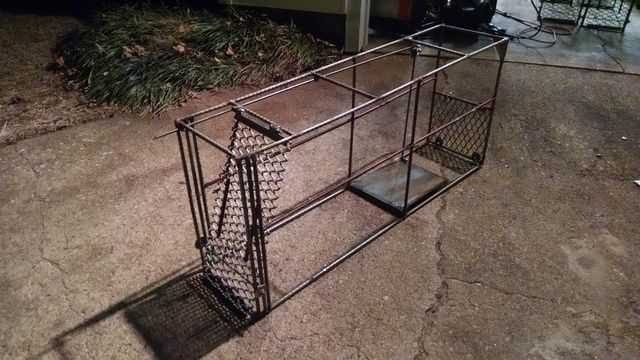 [/URL] [/URL]
Each trap is 18 inches tall, 9 inches wide and 42 inches long, and weighs about 12 pounds. The frame is made from 3/8-inch rebar made from simple rebar electric fence posts. Cheapest steel you can buy at $1.60 for a 4-feet long post. All you have to do is grind the steel triangle off one end before working. Each trap takes about 8 of these posts, maybe 9, depending upon how reinforced you want to make the frame.
The door and the bait access door at the rear of the trap are both expanded metal grating. The pan treadle is 16-ga steel, hinged at the leading edge to ensure that 100% of the pan's surface is active in firing the trap. I got almost all of this steel simply by asking a local manufacturing company for the okay to dig through their scrap bin. Even if you have to pay for it, they'll sell scrap at, like, 10-cents a pound.
Pan and door are hinged using 1/4-inch machine screws through 5/16-inch nuts welded to the frame cross member. Once adjusted, the nuts on the screws were spot welded to keep them from coming out of adjustment.
The door is grating and had some flex to it. Welded two pieces of rebar scrap to the face of the door to serve two purposes. First, it keeps the door from flexing, and second, it creates a "stop" that prevents the cross bar from raising up and allowing the door to open. Even though the door extends below the bottom of the opening of the trap frame, I welded a cleat (rebar scrap) at the bottom as added insurance that the door cannot be pulled into the trap and jammed or damaged.
The trigger mechanism of the trap is a borrowed design and of the cam design. Pretty simple setup as I just welded a 1-inch length of 1/2" OD steel tubing through a fender washer and drilled two quarter-inch holes, one each at 12 and 9 o'clock
to which the linkage rods are attached. The cam is attached to the frame at a short drop bar with a 5/16-inch nut welded onto the bottom. The cam attaches by way of a machine screw that goes through a bronze bushing that lines the inside of the steel tube in the cam, with nylon washers at each end to prevent any metal-to-metal contact that might cause the linkage to seize up due to rust or corrosion. The linkages are simple 1/4-inch round bar with a 5/16-inch nut welded to the end with one going from the pan's corner up to the cam, and the other from the cam to where it passes through two small supporting lengths of steel tubing and into a small ring welded to the door, thus holding it open. At the end of that linkage, I ground a small "night latch" slot that allows you to set the rod into the ring when setting, then move it out until the ring drops into that notch, thus effectively setting the cage to a hair trigger. All connecting points on the linkages use 1/4-inch bolts and Loctited (blue) nylock nuts passing through 5/16-inch (oversized) nuts. The pan only has to drop 1/8- to 3/16-inch before the trap fires.
At the mouth of the trap, you see three vertical bars. The front two create a vertical channel that accommodates the drop bar which holds the door shut when fired. The rearmost third bar is where the mesh is wrapped/ connected. I added this after the fact when I realized I didn't want the drop bar hanging up on the hog rings I'll use to fasten the mesh to the frame.
The drop bar is 1/4-inch all thread with a fender washer and nut welded at each end to keep the bar from pulling out of the slot. The drop bar sits at the top of that channel and just beneath the trigger linkage when the trap is set. When the trap fires, the door drops, the cross bar falls downward in the channel to the bottom where the simple physics of the angles encountered by anything inside the trap pushing out keep the door from opening. If a coon or other critter does manage to get the door to open any at all, it's less than an inch before the crossbar gets pinned by the rebar stops on the outside front of the door.
Each trap will be secured in an upright position and chained/ locked to a tree for safe keeping. The mesh I have for these is 1/2 x 1-inch welded wire fence material. There will be a length of thin plywood placed inside the trap from the door to the leading edge of the pan so anything entering the trap doesn't have to walk on wire.
My goal was to make a trap that cost me much less than the $100+ price tag of commercially available cages designed specifically for bobcats. Ideally, I'd like to come in well under the $50 per unit cost for new Havahart style traps that cats don't like anyway.
Just spit balling what I have in each trap, the most expensive component is easily the wire at just south of $17 per trap. The steel rods for the linkage were about $8. The bronze bushing in the cam was $2.79 and the nuts, bolts and fender washers were about $4, if even that. Add in the cost of the rebar and I figure I have about $47 in each trap, give or take, plus my time, welding wire, grinding/ cut off wheels and, ultimately, flat camo paint, so maybe $50 each.
Hope they work and can't wait to get them set next week.
[ December 15, 2015, 07:09 PM: Message edited by: Cdog911 ]
--------------------
I am only one. But still, I am one. I cannot do everything, but still, I can do something; and, because I cannot do everything, I will not refuse to do something that I can do.
Posts: 5438 | From: The gun-lovin', gun-friendly wild, wild west | Registered: Jan 2003
| IP: Logged
|


 UBBFriend: Email this page to someone!


 Printer-friendly view of this topic